Server Actions
Posted on: 21/08/2026(updated)
React Server Actions allow you to run asynchronous code directly on the server. They eliminate the need to create API endpoints to mutate your data. Instead, you write asynchronous functions that execute on the server and can be invoked from your Client or Server Components.
Using forms with Server Actions
It uses the action attribute in the <form> element to invoke the action. Then revalidate the associated cache with revalidatePath and revalidateTag.
// Server Component
export default function Page() {
  // Action
  async function create(formData: FormData) {
    'use server';

    // Logic to mutate data...
  }

  // Invoke the action using the "action" attribute
  return <form action={create}>...</form>;
}
Forms that invoke Server Actions from Server Components support progressive enhacement. They can be submitted before JavaScript loads on the client.
Ex: Creating an invoice
- Create a form to capture user's input
- Create a server action and invoke it from the form
- Inside server action, extract data from
formData - Validate data to be inserted in Db
- Insert data and handle any errors
- Revalidate cache and redirect user back to invoices page
1. Create a new route and form
To start, inside the /invoices folder, add a new route called /create with a
page.tsx file
import Form from '@/app/ui/invoices/create-form';
import Breadcrumbs from '@/app/ui/invoices/breadcrumbs';
import { fetchCustomers } from '@/app/lib/data';

export default async function Page() {
  const customers = await fetchCustomers();

  return (
    <main>
      <Breadcrumbs
        breadcrumbs={[
          { label: 'Invoices', href: '/dashboard/invoices' },
          {
            label: 'Create Invoice',
            href: '/dashboard/invoices/create',
            active: true,
          },
        ]}
      />
      <Form customers={customers} />
    </main>
  );
}
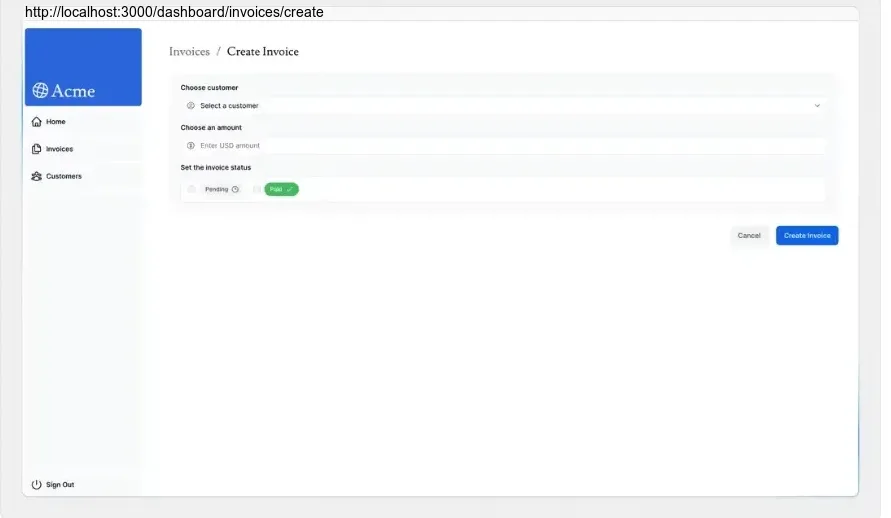
This is a server component that fetches customers, and passes it to the
<Form> component
It now shows:
2. Create a server action
The server action will be called when the form is submitted.
Create a new action.ts file inside of the lib/ directory. This function can then be imported and used in Client and Server components.
Server actions can also be written directly inside server components by using "use server" inside the action.
'use server';

export async function createInvoice(formData: FormData) {}
Then, in your <Form> component, import the createInvoice from your actions.ts file.
Add a action attribute to the <form> element, and call the createInvoice action.
import { CustomerField } from '@/app/lib/definitions';
import Link from 'next/link';
import {
  CheckIcon,
  ClockIcon,
  CurrencyDollarIcon,
  UserCircleIcon,
} from '@heroicons/react/24/outline';
import { Button } from '@/app/ui/button';
import { createInvoice } from '@/app/lib/actions';

export default function Form({
  customers,
}: {
  customers: CustomerField[];
}) {
  return (
    <form action={createInvoice}>
      // ...
  )
}
In HTML, you'd pass a URL to the action attribute (usually an API endpoint).
However, in React the action attribute is considered a special prop - meaning React builds on top of it to allow actions to be invoked.
Behind the scenes, server actions create a POST API endpoint. This is why you don't need to create your own manually when using server actions.
3. Extract data from formData
Back in your actions.ts file, you'll need to extract the values of formData
/app/lib/actions.ts
'use server';

export async function createInvoice(formData: FormData) {
  const rawFormData = {
    customerId: formData.get('customerId'),
    amount: formData.get('amount'),
    status: formData.get('status'),
  };
  // Test it out:
  console.log(rawFormData);
}
You should be able to see data now after submitting it.
4. Validate and prepare data
Before sending the form data to your database, you want to ensure it's in the correct format and with the correct types.
/app/lib/definitions.ts
export type Invoice = {
  id: string; // Will be created on the database
  customer_id: string;
  amount: number; // Stored in cents
  status: 'pending' | 'paid';
  date: string;
};
To handle type validation import Zod and define a schema that matches the shape of your object.
/app/lib/actions.ts
'use server';

import { z } from 'zod';

const FormSchema = z.object({
  id: z.string(),
  customerId: z.string(),
  amount: z.coerce.number(),
  status: z.enum(['pending', 'paid']),
  date: z.string(),
});

const CreateInvoice = FormSchema.omit({ id: true, date: true });

export async function createInvoice(formData: FormData) {
  // ...
}
Creating new dates
/app/lib/actions.ts
// ...
export async function createInvoice(formData: FormData) {
  const { customerId, amount, status } = CreateInvoice.parse({
    customerId: formData.get('customerId'),
    amount: formData.get('amount'),
    status: formData.get('status'),
  });
  const amountInCents = amount * 100;
  const date = new Date().toISOString().split('T')[0];
}
5. Insert data into database
Create an SQL query to insert the new invoice into your database and pass in the variables:
/app/lib/actions.ts
import { z } from 'zod';
import postgres from 'postgres';

const sql = postgres(process.env.POSTGRES_URL!, { ssl: 'require' });

// ...

export async function createInvoice(formData: FormData) {
  const { customerId, amount, status } = CreateInvoice.parse({
    customerId: formData.get('customerId'),
    amount: formData.get('amount'),
    status: formData.get('status'),
  });
  const amountInCents = amount * 100;
  const date = new Date().toISOString().split('T')[0];

  await sql`
    INSERT INTO invoices (customer_id, amount, status, date)
    VALUES (${customerId}, ${amountInCents}, ${status}, ${date})
  `;
}
6. Revalidate and redirect
Next.js has a client-side router cache that stores the route segments in the user's browser for a time. Along with prefetching, this cache ensures that users can quickly navigate between routes while reducing the number of requests made to the server.
Since you're updating the data displayed in the invoices route, you want to clear this cache and trigger a new request to the server. You can do this with the revalidatePath function from Next.js:
/app/lib/actions.ts
'use server';

import { z } from 'zod';
import { revalidatePath } from 'next/cache';
import postgres from 'postgres';

const sql = postgres(process.env.POSTGRES_URL!, { ssl: 'require' });

// ...

export async function createInvoice(formData: FormData) {
  const { customerId, amount, status } = CreateInvoice.parse({
    customerId: formData.get('customerId'),
    amount: formData.get('amount'),
    status: formData.get('status'),
  });
  const amountInCents = amount * 100;
  const date = new Date().toISOString().split('T')[0];

  await sql`
    INSERT INTO invoices (customer_id, amount, status, date)
    VALUES (${customerId}, ${amountInCents}, ${status}, ${date})
  `;

  revalidatePath('/dashboard/invoices');
}
Once the database has been updated, the /dashboard/invoices path will be revalidated, and fresh data will be fetched from the server.
At this point, you also want to redirect the user back to the /dashboard/invoices page. You can do this with the redirect function from Next.js:
/app/lib/actions
'use server';

import { z } from 'zod';
import { revalidatePath } from 'next/cache';
import { redirect } from 'next/navigation';
import postgres from 'postgres';

const sql = postgres(process.env.POSTGRES_URL!, { ssl: 'require' });

// ...

export async function createInvoice(formData: FormData) {
  // ...

  revalidatePath('/dashboard/invoices');
  redirect('/dashboard/invoices');
}